
Working with wire: getting great results wrapping and twisting
My own personal experience of working with wire is mostly for French beading. However, the secrets I am about to share with you are also applicable to other types of wirework. So, even if you use wire to make jewellery, these top tips will really help.

I’m going to start by explaining the difference between wrapping and twisting. (Spoiler alert: it may not be what you think!). Then I want to show you simple tricks to get the best out of both techniques.
Do you know the difference between wrapping and twisting?
When you are working with wire, pretty much everything you do is going to involve either wrapping or twisting your wire.
Put simply, both these techniques have two purposes. Firstly, they hold beads in place. Secondly, they give the wirework an attractive finish.
The two techniques share one thing in common. They are both about finding a way to combine or join two pieces of wire. So, how do they differ?
You may think you know the difference, but do you? Have you ever thought about how the wire looks when it has been wrapped or twisted? Do you know how to achieve the best results in each technique?
Can you tell from the photo below which wire has been wrapped and which has been twisted?


Wrapping wire defined
Put simply, when you are wrapping wire, you will be holding one of your pieces still. The other piece does all the work, wrapping around the still strand of wire.
Definition of twisting wire
If you want to twist your wire, then you will be moving both pieces. So the two pieces twist around one another.
This is crucial if you want to achieve the perfect finish. If you hold one piece still and try to move the other, you will end up with a messy diagonal wrap, not a twist.
How to make the perfect wire wrap
Wire wrapping is the easiest of the two techniques. The key is to hold the ‘base wire’ still in one hand. This is the horizo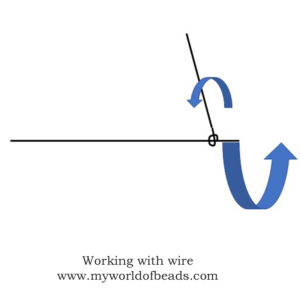 ntal wire in the diagram and you will hold it in your non-dominant hand.
Then, take your second piece of wire and wrap it around the base. So, you will be holding this wire in your dominant hand and wrapping in a circular motion. You can go clockwise or anti-clockwise, whichever feels more comfortable. Just remember to keep going to same way!
The trick to get ting a good wrap is to take your time. Every time you create a new wrap around the base wire, you want to be sure that it is butted right up next to the previous wraps.
If you’re not careful, you can end up with gaps, as in the example in the photo.
Wrapping in French beading
For French beading, you will be wrapping your wire whenever you are doing any variations of the ‘basic technique’. So, this is commonly used to make leaves and individual petals.
You are using the technique to hold rows of beads in place. So, your base w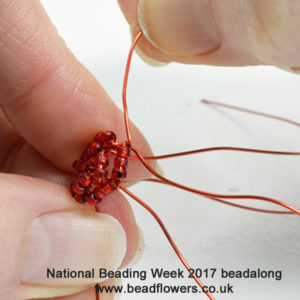 ire gives the structure. Imagine this like the central vein of a petal. As you add rows of beads, you wrap the wire to hold the beads in place. So the base wire must remain straight and you will wrap the working wire around it.
A wrapped wire allows for some movement up and down the base wire. So, if you want to adjust the shaping on leaves, you have the ability to move the wire holding the rows in place.
If you had twisted your wire, you would not be able to create this movement.
Creating the perfect wire twist
Of all the techniques for working with wire, I actually think twisting is one of the hardest. …Unless you know the simple trick I am about to show you!
As I said above, the key to a neat twist is to make sure that both wires move around one another. The wires have a natural tendency to try and move into a position where one wire is still and the other is wrapping.
So, you have to use your hands to prevent this from happening.
Let me show you the theory. If you are twisting wires, the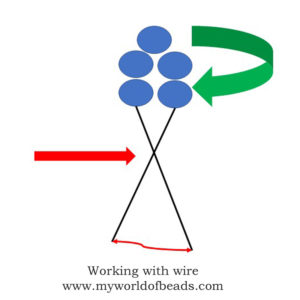 n you will have an object above the twist. This could be just a loop of wire. Or it could be a loop of beads, or a single bead. The point is, whatever this object may be, you are going to hold onto it.
Then use your other hand to separate out the two wires. You want them to slant away from each other below your object. There should be about a 45-60 degree angle between them. In the diagram, the fat red arrow indicates where you hold the wires, creating the crossover with separation. The thin line shows the angle of separation.
So, having got all this in place. You are then going to turn the object you are holding (shown by the green arrow in the diagram) and the wires below will twist. As long as you keep them separated out, they will form a nice even twist because they are moving around one another.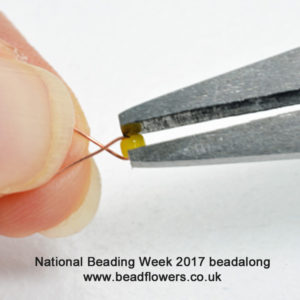
This is how the procedure looks in real life. I have used a pair of pliers to hold the object (a single bead) as that gave me more control. Notice how my other hand is separating the wire, so when I turn the object in my pliers, I will end up with a beautiful neat twist.
Again, the trick is to take things slowly. Keep those two wires separated and make sure both are at an angle.
 The danger point is if you allow one wire to slip to a vertical position while the other remains at an angle. Then you will end up with a messy twist in which the angled wire is wrapping around the vertical wire. The end result is simply less attractive.
As with any technique, this is going to take some practice. Even with experience, it will not always be perfect. But at least you now know the little trick that helps to achieve perfection!
Demonstrations of working with wire
Now, I know that not everyone learns well from reading and looking at photos. So, if you are serious about working with wire and you want to see some demonstrations, I can help.
I have published two books teaching people how to work with wire to create French beaded flowers. In each of these I showed the techniques on video. So, you get to watch how I use my hands, as well as reading the theory.
Practice on your own
You can also practice the theories you have just learned. So, try this little exercise.
Follow this link to download a free tutorial of the French beaded loop techniques. Then, make the single loop flower. This will give you practice in twisting.
When you have finished your first flower, complete the stem by twisting it. So, you will get to try twisting a long length of stem wire.
Make a second flower. Then find some green wire and use this to wrap around the flower stem. So, this will allow you to practise your wrapping technique.
If this has whetted your appetite, you can find more great French beading tutorials here.


Great explanation.